Aggiungere connessione wifi al raspberry pi e dintorni
by zaion on Set.03, 2012, under Hardware lab
Appena è arrivato il mio Raspberry-PI non vedevo l’ora di provarlo e giocarci ma solamente accenderlo si è rivelato più complicato del previsto.
Per evitare i comuni problemi di alimentazione ho alimentato il mio raspberry tramite i GPIO con un alimentatore ATX. Tensione ben stabilizzata e tanta corrente a disposizione (Oltre alla protezione da corto).
Ho acceso la scheda e ho provato a configurare una chiavetta wifi per potermi connettere da remoto. Il sistema operativo l’ha subito riconosciuta, caricato i driver e aggiunto la periferica. Ho configurato i parametri per connettermi al mio Access Point ma non ne voleva sapere di funzionare. Il listing delle reti rilevate funzionava saltuariamente e le poche volte che riuscivo a connettermi si sconnetteva da solo subito dopo lasciando questo strano messaggio su dmesg:
No probe response from AP <address> after 500ms, disconnecting
Pensavo fosse un problema di driver ma non riuscivo a venirne fuori, nemmeno cercando in rete.
Per curiosità, come ultimo tentativo, ho misurato la tensione di alimentazione della chiavetta USB e ho visto che era di circa 4V (meno in trasmissione), tremendamente al di sotto di quello che pensavo e che dovrebbe essere. Ho subito controllato la tensione di alimentazione della scheda e ho visto che era più che perfetta. Una specie di magia.
C’è una caduta di tensione di circa 1V tra l’alimentazione della scheda e le prese USB. La pista in questione ha una resistenza di 3-4 Ohm, evidentemente è troppo sottile per la corrente che deve sopportare.
2 prese USB = 2 x 500mA = 1A
3 Ohm * 1A = 3V
Al massimo teorico di assorbimento per lo standard USB la caduta di tensione arriva fino a 3 Volt. E questo non è bello.
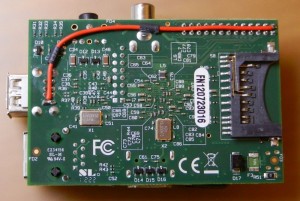
Ho saldato un filo in parallelo alla pista, cioè dal connettore di alimentazione (GPIO nel mio caso) fino alle prese USB.
Un lavoro semplice da fare con un minimo di pratica e uno stagnatore. Basta stare attenti e non fare corti e cercare di essere puliti.
Dato corrente alla bestia che ha cominciato a funzionare a dovere. Viva! Mai un errore. Scalda anche meno adesso.
Modifica semplice e molto utile. Magari se alla Farnel hanno in programma una revisione del PCB possono aggiungerla nella TODO list.
Zaion
Adding wifi connection on raspberry-pi and something else
When I have got my Raspberry-PI could not wait to try it out and play but just turn it on was more complicated than expected.
To avoid common feeding problems I powered my raspberry through GPIO with an ATX power supply. Voltage well stabilized and a lot of current available (In addition to protection against shorts).
I turned on the board and tried to set up a USB wifi dongle to be able to connect remotely. The operating system recognized it immediately, loading the drivers and adding a new device. I have configured the parameters to connect to my Access Point but did not want to work. The listing of detected networks worked intermittently and the few times I could connect the link drop down just after a second by itself leaving this strange message on dmesg:
No probe response from AP <address> after 500ms, disconnecting
I thought it was a driver issue but I could not get out, not even searching the internet. Out of curiosity, as a last resort, I measured the voltage of the USB stick and I found it was about 4V (even less when transmitting), tremendously below what I thought and what it should be. I immediately checked the board power supply and saw that the voltage was perfect. It’s a kind of magic. There is a voltage drop of about 1V between the power supply of the board and the USB sockets. The track in question has a resistance of 3-4 ohms, evidently is too thin for the current it must withstand.
2 USB sockets = 2 x 500mA = 1A
3 Ohm * 1A = 3V
At the theoretical maximum current absorption for the USB standard, the voltage drop reaches up to 3 volts. And this is not good.
I soldered a wire in parallel to that track, that is, from the power connector (GPIO in my case) to the USB sockets.
A simple job to do with a little practice and a tin welder. Just be careful to not make shorts and be clean. Fed the beast with some current and it began to work properly. Alive! Never ever a problem. Run even less hot now. Simple and very useful mod.
Maybe if Element 14 is planning a revision of the PCB they can add it to the TODO list.
Zaion


